Showing posts with label creative. Show all posts
Showing posts with label creative. Show all posts
Saturday, February 13, 2010
My new Cricut
My hubby bought me a Cricut Expressions for Christmas. I have been a little intimidated about opening it up... IDK why, I just am. I think the instruction manual was the biggest reason I hadn't opened it. I am one of those people that do better watching then reading. But today I decided today was the day. So I opened up the box and discovered a DVD inside. Ok, I thought, let's see what this thing can do. I popped the DVD into my computer and sat through the 39 minute instruction DVD. Now I'm excited and can't wait to give it a try. I will update again when I get going on my newest creation.

Tuesday, February 9, 2010
Wall Hanging
More Mod Podge!! I covered a B with some of my favorite fabric to hang in the dining room. It was quick and easy.
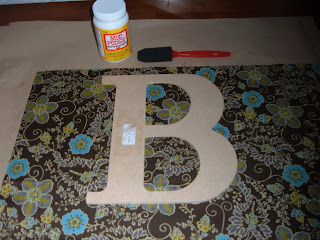 The letter B I bought at the local Hobby Lobby. I think it said it was MDF. Can't remember tho. The fabric is from a pack of fat quarters I bought. I used about a quarter of the fat quarter.
 I used a light coat of MP on the front, so it wouldn't leak thru the fabric and make it darker. I had to cut the fabric in places to make the fold around the curves. The white in the photo is the still wet Mod Podge. I put quite a lot on the back to make sure it was super sealed.
 The finished B!!! I am going to attach a ribbon to the back and use that to hang it with. It was a fast and easy project.
Happy Crafting!!


 I used a light coat of MP on the front, so it wouldn't leak thru the fabric and make it darker. I had to cut the fabric in places to make the fold around the curves. The white in the photo is the still wet Mod Podge. I put quite a lot on the back to make sure it was super sealed.
 The finished B!!! I am going to attach a ribbon to the back and use that to hang it with. It was a fast and easy project.
Happy Crafting!!

Sunday, February 7, 2010
Mod Podge
Years ago, I Mod Podged some dried flower petals (that came from my garden) onto a photo box. It looked pretty nice then. Cut to now, and the petals have turned brown and chipped away. So I thought I would Mod Podge fabric over it.

 Top of the box.
 First I Mod Podged the top of the box. I let it get good and dry.
 The dark streaks is from the Mod Podge being too thick in places and soaking thru the fabric. I ended up putting a couple of layers of MP to seal it and get rid of the streaks. Unfortunately, this also darkened the fabric.
 I then did the sides. I folded the fabric like you would a present and made sure the fabric went all the way over, into the inside of the lid for a more finished look. I then put a couple of coats on to seal it all up.
 TA-DA!!! Finished! The top bubbled up a little in some places. I'm not sure if that's because I didn't use enough MP to glue it to the top or if I didn't smooth it down enough. But all in all, not a bad job. And it definitely looks better then it did lol. Now I have 5 more to do lol.
Happy Crafting!!


Happy Crafting!!

Tuesday, January 26, 2010
Pig-Pig
I made a new critter today. It's a pig lol. Not too many issues sewing it. The biggest issue is I cut the ears wrong and then I had trouble sewing the corrected ears on. Let's get to the pics!


I used a cream colored sock for the nose and a pinkish sock with a purple cuff for the body.

I have a book for making these animals and the instructions aren't always clear. But I worked my way thru it. Had to take an hour break because of frustration with the ears. But after that everything went pretty smoothly.


Happy Crafting!!

Tank Top
I am going to attempt the Cut Sew & Go tank top today (I think). It's a really cold and snowy day here in Ohio so making something meant for summer seems a little ridiculous to me lol. If not, I will make another critter, this one for my niece.
Sunday, January 24, 2010
New Craft!!
I started making what I've been calling Critters. They are stuffed animals made out of socks. I love making their cute little faces. That's when they COME TO LIFE!! lol
They start off with a sock. I really like the socks with the color block heels and toes. The heels (depending on the size of the sock) can become either the face (child's sock) or in this case, the belly.


And Scat has found a new friend.

They start off with a sock. I really like the socks with the color block heels and toes. The heels (depending on the size of the sock) can become either the face (child's sock) or in this case, the belly.

This is the adult sized sock I started with. I have a book on making sock creatures so I followed the instructions on cutting out my sock.

I will save you the boring details. I noticed some of my blogs have gotten quite long winded. I sewed the critter by hand and added stuffing. Then came the fun part... making the face!! I had a little trouble of course. After I drew the face on with a watercolor marker, I threaded my needle with thick thread. In order to hide the knots, you are suppose to come up thru the area where you stuffed the critter. (I've been calling it the butt lol) My needle wasn't long enough to reach all the way up to the head. I had to squish the little guy down pretty flat and grab the needle with my teeth and pull it out that way.
I started on the nose and got all the way down to the bottom. The instructions said to make a french knot at the end. Having never made a french knot, I didn't realize that I was too far away from the bottom of the nose. The hubby said it looked like Critter had snot running down his face lol.

I ended up using my seam ripper and starting over. Didn't like my second nose either. Third time I got a good, snot free nose lol. Then I stitched in the mouth and eyes. Here is the completed critter.

And a close up of the face. Sorry it's blurry but I don't think I did half bad.

And Scat has found a new friend.

Happy Crafting!!

Saturday, January 23, 2010
Kindle Sleeve
I finally figured out what I want to call my newest project. It's a Kindle Sleeve. lol. The hubby wanted one to protect the Kindle that I bought him for Christmas. He said he felt bad putting it into his messenger bag without any protection since it could slide around in the pocket with his pens and wallet and papers. I really had fun with this project, it was the first one that I didn't use some sort of pattern or instructions on, I just used my brain :)
First I measured the dimensions of the Kindle. Then I doubled the length, and added 4 inches for the flap.


First I measured the dimensions of the Kindle. Then I doubled the length, and added 4 inches for the flap.

Looks high-tec doesn't it lol.
So I cut the fabric and batting to my measurements.

Only problem was that I didn't cut my lines straight. Everything sort of leaned to the left (sings that Beyonce song) When I put my fabrics together, the edges didn't meet up. So I hunted down a metal ruler and squared off my fabric from the edge.

The black line is my new squared off rectangle. You can see how far off I was. With that done, I got off to work!


Sewing went really well. No really big problems there. The problem came when I layed the Kindle on the sleeve to see how much room it had. Remember when I said I had to square it up? Well that took valuable space off my measurements. It was a really tight fit.

Not much room to sew the sides together. So now what? Do I scrap all my hard work and start over? Or do I soldier on? I talked to the hubby and he said I should keep going. And that's what I did (thank you babe for having faith in me) I conjured up my inner Tim Gun and "Made It Work"
I wasn't sure if I could even get the sleeve under my pressure foot. Once I doubled the fabric to create the pocket it was so thick, I had to wiggle it under the foot. But I got it to work. I slowly sewed up the sides (sorry no pic showing how close to the edge I was) The sewing machine did freak out on me twice, stopping dead in its tracks and cursing at me in its beeping language. I just manually raised the needle and continued on.
I finally finished it!! It is extremely snug, I must admit. Took quite a bit of work to wiggle the Kindle down.

After I took the Kindle out, I added a velcro closure that I hand sewed on. I only went thru the top layer of fabric so you wouldn't see the stitches when the flap was closed. And the second time we wiggled the Kindle into the sleeve, it wasn't as snug as the first. So hopefully with use it will get easier and easier.

The husband loves it and can't wait to show his friends at work. lol. I guess that's all that really matters :)
I am considering making some and trying to sell them on Etsy.com. I am TheGoddessEnyo if you want to look for me once I get things to sell. I'm also going to put my sleep masks up.
Thanks and happy crafting!!
6 Crafty Cats
Thursday, January 21, 2010
Finally Finished
I finally finished the sleep masks that my Mom embroidered the other day! A few kinks along the way, but that's just par for the course for me lol. Ok lets get to it!!
First things first. This is why I call the blog 6 Crafty Cats. I can't do anything without a few of them wanting to know what I'm doing. See the following pics:


First things first. This is why I call the blog 6 Crafty Cats. I can't do anything without a few of them wanting to know what I'm doing. See the following pics:

This is Scat. He's 15 and probably the friendliest little guy you'll ever meet. Here he is laying on my sewing machine cover. The second I pulled out my chair, he jumped on it and ran his fat butt over and plopped himself down lol. Here is another shot from my vantage point:

As I'm getting ready to work, another cat Poo came up to me. He likes to sit there and meow at me. If he doesn't get to see what I'm doing, he will pester me until he does. Here he is sniffing my scissors:

It's never boring here lol.
I started out by making marks on my pattern to line up the elastic and to keep future projects consistent.

I then sewed my first mask, the zebra print. Everything went surprisingly well, at first... When I was finished and was turning the mask inside out, I discovered I made the opening a little too small, making turning right side out difficult. No biggie, I managed to get it turned.

Sorry for the blurry pic. I hope you can see it ok. My camera sucks at closeups.
I was smoothing the seams and feeling quite proud of myself. And that's when I noticed... a slight puckering (for lack of a better word) in the nose area. The fabric wasn't laying flat and was folded over. Like this:

Kind of hard to see it but if you look really close into the curve I think you can make it out. As I got up, voicing my opinion with a lot of 4 letter words, another cat showed up in my chair:

This is Mojo. He's about 3 now. He came in from outside as a little stray that showed up with another stray that I had been feeding. He's a shy little guy and does not like kisses lol.
I took a break, went out, had dinner with the hubby and thought about the puckered mask. I remembered seeing somewhere a diagram about cutting seams on a curve. You cut little triangle points up to the seams. So I thought I would try it. Couldn't hurt right? Well..... IT WORKED!!! *Happy Dance*

I got up, ran to my husband and showed him. (and did the happy dance again) Upon returning to my work area I saw this:

Here are the 2 masks completed. The zebra print is for a friend's 9 year old daughter. Her room is hot pink and zebra print. The pink leopard print is fro my 6 year old niece. It says "Big Sister". She was so excited to become a big sister in April of 2009. It's hard to read, but since she can't read cursive yet, I wanted a nice pretty font.


Well that was my adventure for the day!!
From Scat and the gang, take care!!
6 Crafty Cats
Wednesday, January 20, 2010
*sigh*
Didn't get to the masks last night. I got home, sat down to watch a little tv... and fell asleep lol. Probably won't do much tonight either since I work until 8.
Take care!
6 Crafty Cats
Take care!
6 Crafty Cats
Tuesday, January 19, 2010
MOAR sleep masks!!
Just came home from M&Ps. Mom embroidered 2 more sleep masks that I will be finishing tonight. Can't wait!!
Monday, January 18, 2010
So Its Been Awhile...
Its been a few months since I posted.Typical. So yeah, I'm sorry and blah blah blah. I never claimed to be perfect :P
Last night I made a sleep mask. It turned out really cute. Had a few issues...
It all started when I decided I wanted a sleep mask. There is a street light about 2 houses down and across the street and on some nights when I am having my issues sleeping, it's one of the many things that get on my nerves. So I thought a sleep mask would be perfect. I went onto my fave site, Etsy, and did a search on sleep masks. There were some totally beautiful masks on there (and some not so great ones.) Of course the ones I like were $16.00. Um yeah.... I figured I could make one cheaper. So I decided to do a google search on sleep mask patterns. I found one I liked, printed it out, quickly skimmed over the instructions and with the hubby in tow, went out to get the supplies I needed, plus some lol
I gotta give it to the husband. He was willing to trek out in the rain and cold so that I could satisfy my whims. Anyway... tried to go to Joann Fabrics in a neighboring area, only to find out it was closed. Like, closed down, no more, thats it, bye-bye gone.So decided to go to the local Walmart. Yeah.... sorry but I hate Walmart (atleast our local one) But I'm not going to get into that here lol.
I found some fabric that I liked in fleece and flannel, a new measuring tape, new pins and white elastic. Great!! I was ready to go! Sunday night is dinner @ Mom and Dad's, so with everything in tow, we went there. Turns out this was perfect because I needed Mom to embroider "sleep" on the fabric I was going to use. When I got there, Mom and my niece were modifying a "snuggie" to fit my 6 year old niece. Apparently, my Pops had won one while he was at the gambling boats. It was a pretty seafoam green and was really soft. There were scraps of the sleeves laying around and I asked if I could have them. So I took the snuggie remains and looked thru Mom's fabrics to see if she had anything to match. (Of course nothing I bought matched) So I found fabric I liked, and found thread for the embroidery.
LOOOOOOONG story short, I cut out the pieces and got ready to sew after we got back home (dinner btw was de-lish of course, lasagna yummy!!) I had to hunt a little for my sewing machine. Its probably been 8+ years since I've used it, wasn't even sure if it would work. Took the cheap little cover off, wiped the dust off, and powered it up. Everything looked fine, so I sewed a test facric. So far so good!!

Now here is where the trouble started...
I put the mask under the foot, batting side down, and started sewing, slowly at first, because its been awhile. I did a few forward, a few back, and then started forward again. I noticed that it wasn't moving!! Cripes!! I quickly stopped, lifted the foot, and discovered a birds nest underneath!! (wish I had taken a pic) I carefully tried to cut my project out of the mess. I don't know if it was my cutting or the birds nest but my fabric got a little ripped (again wish I had a pic)
So I took the few stitches out of my project and started again. This time I thought I would sew with the batting up. Great idea huh? Nope! When I had cut out my pieces of fabric, I must have flipped the pattern on the batting so the pieces didnt quite match up. No problem when I was sewing with the batting down... BIG problem when I was sewing with the batting up. Sewed the whole darn thing. I was feeling really excited!! Turned it over to see the pretty fabric side... and parts of the stitches weren't even on the fabric!! UGH!! (again I wish I had a pic) Do I even need to tell you all the 4 letter words that were coming out of my mouth? I think I made the cats blush. So I found what I thought was my trusty seam-ripped and started taking the stitches out. Unfortunately, it was a cheap ripper that wasnt actually sharp, so no ripping went down. I had to pull each stitch out by hand. Can you say headache?lol
So I got all the stitches out and started again. "Third time's a charm" I said to my husband (even tho I was about to throw the mask out the window) I decided to sew it batting down again. I very slowly started. A few stitches forward, a few back, and then forward again. I did a few stitches and stopped. Did a few more, stopped. Did this all the way around the mask, feeling my confidence grow. The stps got fewer and fewer as I got more confident. Finally I was done!! I took my work off the machine, and trimmed my threads. Inspected it and even tho the sewing wasnt perfect, I finally made it!! I turned it inside and and it looked perfect (atleast to me after all I went thru lol)


Here is a close up of my hand stitching to close it up. Sorry its blurry but I guess I need a new camera. The weird little bit is where the hole was and I tried to sew it up the best I could. All in all, I'm happy with it and it feels good to be sewing again :)

Love to all,
6 Crafty Cats
P.S. I used the mask last night and had a really good night's sleep, my first in about a week :)
Last night I made a sleep mask. It turned out really cute. Had a few issues...
It all started when I decided I wanted a sleep mask. There is a street light about 2 houses down and across the street and on some nights when I am having my issues sleeping, it's one of the many things that get on my nerves. So I thought a sleep mask would be perfect. I went onto my fave site, Etsy, and did a search on sleep masks. There were some totally beautiful masks on there (and some not so great ones.) Of course the ones I like were $16.00. Um yeah.... I figured I could make one cheaper. So I decided to do a google search on sleep mask patterns. I found one I liked, printed it out, quickly skimmed over the instructions and with the hubby in tow, went out to get the supplies I needed, plus some lol
I gotta give it to the husband. He was willing to trek out in the rain and cold so that I could satisfy my whims. Anyway... tried to go to Joann Fabrics in a neighboring area, only to find out it was closed. Like, closed down, no more, thats it, bye-bye gone.So decided to go to the local Walmart. Yeah.... sorry but I hate Walmart (atleast our local one) But I'm not going to get into that here lol.
I found some fabric that I liked in fleece and flannel, a new measuring tape, new pins and white elastic. Great!! I was ready to go! Sunday night is dinner @ Mom and Dad's, so with everything in tow, we went there. Turns out this was perfect because I needed Mom to embroider "sleep" on the fabric I was going to use. When I got there, Mom and my niece were modifying a "snuggie" to fit my 6 year old niece. Apparently, my Pops had won one while he was at the gambling boats. It was a pretty seafoam green and was really soft. There were scraps of the sleeves laying around and I asked if I could have them. So I took the snuggie remains and looked thru Mom's fabrics to see if she had anything to match. (Of course nothing I bought matched) So I found fabric I liked, and found thread for the embroidery.
LOOOOOOONG story short, I cut out the pieces and got ready to sew after we got back home (dinner btw was de-lish of course, lasagna yummy!!) I had to hunt a little for my sewing machine. Its probably been 8+ years since I've used it, wasn't even sure if it would work. Took the cheap little cover off, wiped the dust off, and powered it up. Everything looked fine, so I sewed a test facric. So far so good!!

Now here is where the trouble started...
I put the mask under the foot, batting side down, and started sewing, slowly at first, because its been awhile. I did a few forward, a few back, and then started forward again. I noticed that it wasn't moving!! Cripes!! I quickly stopped, lifted the foot, and discovered a birds nest underneath!! (wish I had taken a pic) I carefully tried to cut my project out of the mess. I don't know if it was my cutting or the birds nest but my fabric got a little ripped (again wish I had a pic)
So I took the few stitches out of my project and started again. This time I thought I would sew with the batting up. Great idea huh? Nope! When I had cut out my pieces of fabric, I must have flipped the pattern on the batting so the pieces didnt quite match up. No problem when I was sewing with the batting down... BIG problem when I was sewing with the batting up. Sewed the whole darn thing. I was feeling really excited!! Turned it over to see the pretty fabric side... and parts of the stitches weren't even on the fabric!! UGH!! (again I wish I had a pic) Do I even need to tell you all the 4 letter words that were coming out of my mouth? I think I made the cats blush. So I found what I thought was my trusty seam-ripped and started taking the stitches out. Unfortunately, it was a cheap ripper that wasnt actually sharp, so no ripping went down. I had to pull each stitch out by hand. Can you say headache?lol
So I got all the stitches out and started again. "Third time's a charm" I said to my husband (even tho I was about to throw the mask out the window) I decided to sew it batting down again. I very slowly started. A few stitches forward, a few back, and then forward again. I did a few stitches and stopped. Did a few more, stopped. Did this all the way around the mask, feeling my confidence grow. The stps got fewer and fewer as I got more confident. Finally I was done!! I took my work off the machine, and trimmed my threads. Inspected it and even tho the sewing wasnt perfect, I finally made it!! I turned it inside and and it looked perfect (atleast to me after all I went thru lol)

There's the final result! Is it perfect? No... but I'm pretty satisfied with it.


Love to all,
6 Crafty Cats
P.S. I used the mask last night and had a really good night's sleep, my first in about a week :)
Friday, October 9, 2009

Ok, so I'm not a great writer. I don't have anything profound to say. I'm not overly talented. If your looking for something like that, look somewhere else.
This blog is for those of us that are starting out. Our pieces of work in whatever media we choose is still a little rough, not quite perfect. But everyone has to start somewhere. I will post my trials here in these pages. Everything from cooking to crocheting to beading to painting. I'm not exactly sure what I will post. But I know the things I post will not be perfect. Especially my crocheting...
I hope this encourages people to try new things, to improve the things that they know.
This blog is for those of us that are starting out. Our pieces of work in whatever media we choose is still a little rough, not quite perfect. But everyone has to start somewhere. I will post my trials here in these pages. Everything from cooking to crocheting to beading to painting. I'm not exactly sure what I will post. But I know the things I post will not be perfect. Especially my crocheting...
I hope this encourages people to try new things, to improve the things that they know.
Subscribe to:
Posts (Atom)